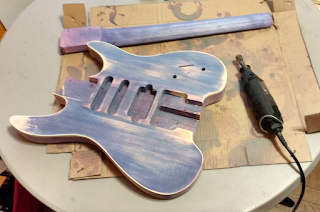
I have continued to try to for once start and finish a project quickly!
The first step this morning was sanding off some of the first dye coat from last night to get a more extremely uneven look. I left some of the deep blue areas, really sanded down others. I got rid of the bad runny blotches where possible. There are a few spots where glue from the binding has gone deep into the wood and I'm going to, in the end, live with those. Life is just too short. The sanding was a combination of lazy "paper around the finger", a sanding sponge and a dremel tool.
I also sanded some streaks down the back of the neck as well. Here's the back of the body.
Finally, having built one of these before one of the problems is that the bridge route leaves absolutely no room to take the bridge off, leaving the bottom mount in place, and snap it back in. That's because doing so requires pulling the bridge back so the knife edges can go up and over the bridge posts. Putting it back in requires pulling it back and pushing it down in. Doing this is a lot of fun. But it is even more fun when the bridge sits in the route exactly.
See this Steinberger GU?
There's a little space to pull the bridge back after lowering spring tension. Check out the Steinberger instructions here. These ammoon kits do not have that space.
Now luckily for Steinberger owners, the spring stays on the master screw when you loosen it. Unluckily for both of the "Overlord of Music" R-Trem copies I've had, it does not. So it's a bit of a ship in a bottle exercise to get it out and especially get it back in. With persistence though, it can be done. But it doesn't get done at all if you have no space!
There's always a mishap during a few hours of work. Especially when you're being rushed off to brunch on a Sunday morning. And often they're reversible. Sometimes you just have to live with it. Trying to widen a route with a dremel by eyeballing it is probably the worst life choice you can make. And as you can see, I did a great job on the bass side. The treble side looks...well...eyeballed with a dremel. But there is now some space! Last build I needed to chisel the space out after finishing. No fun.
Finally the second dye coat. It is still trying off in this photo. But you can see where it is going. The dye mix was a bit different this time. About 2-3X more concentrated. Heavier on the red to blue (5 to 4). No alcohol. This allows the blue to recede a bit and the reds to really come through. I'm happy with where this is going and will check tonight if I need another dye coat.
That's going to be it for about a week while I travel for work and the wood dyes out. I applied a very aggressive amount of liquid and this basswood sucked it up. So before sealing, I want it to be nice and dry again. In the meantime, I get to go to work on Monday with purple spots all over me...
Accumulating unfinished guitar repair and build projects one impulse purchase at a time.
Subscribe to:
Post Comments (Atom)
For Sale: Seymour Duncan Sentient 8
Update: this pickup sold! This articulate neck humbucker sounds great in darker, warmer instruments (ex: mahogany body with a rosewood fre...

-
This is an older project I never got around to posting. About a year ago I got a great eBay deal on a cheap telecaster with a flamed maple...
-
Update: this pickup sold! This articulate neck humbucker sounds great in darker, warmer instruments (ex: mahogany body with a rosewood fre...
-
We're finally close to the finish line with this one. This next picture shows a tip that applies to any of these low end headless kits....


No comments:
Post a Comment